This chapter describes:
The routines in Photon's Pg library are the lowest-level drawing functions. They're used by the widget library to draw the widgets. You can use the Pg functions from a Photon application, but your application will need to:
 |
You should use widgets whenever possible because they do all of the above themselves. |
If your application must do its own drawing, you should use the PtRaw widget. It does the following:
To create a PtRaw widget in PhAB, click on its icon in the widget bar:

Position it where you want your drawing to appear.
You can provide up to four functions for the PtRaw widget. They're called in the order given below when the widget is realized, and are then called as necessary:
Most of the time you'll need to specify only the drawing function (see below). You can use PhAB's function editor (described in the Editing Resources and Callbacks in PhAB chapter) to edit these resources - but you must give the raw widget a unique instance name first.
For information on PtRaw's resources, see the Photon Widget Reference.
When you create a PtRaw widget in PhAB and edit its Pt_ARG_RAW_DRAW_F function, you'll see default code like this:
void my_raw_draw_fn( PtWidget_t *widget,
                     PhTile_t *damage )
{
    PtSuperClassDraw( PtBasic, widget, damage );
}
The call to PtSuperClassDraw() (described in the Building Custom Widgets guide) invokes PtBasic's draw function, which draws the raw widget's borders, fills the widget, and so on, as specified by its resources. The raw widget can do all this by itself, but using PtSuperClassDraw() reduces the complexity of the raw drawing function.
There are several things to consider in the raw drawing function:
These are described below, followed by some examples of simple drawing functions.
 |
Don't call PtBkgdHandlerProcess() in
a PtRaw widget's drawing function.
Don't change any other widget in any way (creating, destroying, setting resources, and so on) in a raw widget's drawing function. It's safe to get resources from other widgets. Don't call the drawing function directly from your program. Instead, damage the widget by calling PtDamageWidget(), and let the library call the drawing function. |
You can determine the raw widget's canvas by calling PtBasicWidgetCanvas() as follows:
PhRect_t  raw_canvas;

PtBasicWidgetCanvas (widget, &raw_canvas);
You'll need this canvas to perform any required translations and clipping.
The origin for the drawing primitives is the upper left corner of the raw widget's parent's canvas. You'll probably find it easier to use the upper left corner of the raw widget's canvas as the origin.
Once you've determined the raw widget's canvas, you can do one of the following:
PhPoint_t    c1 = { 80, 60 };
PhPoint_t    r = { 72, 52 };

c1.x += raw_canvas.ul.x;
c1.y += raw_canvas.ul.y;
PgSetFillColor(Pg_YELLOW);
PgDrawEllipse ( &c1, &r, Pg_DRAW_FILL );
This is the preferred method.
PhPoint_t    c1 = { 80, 60 };
PhPoint_t    r = { 72, 52 };

PgSetTranslation (&raw_canvas.ul, Pg_RELATIVE);

PgSetFillColor(Pg_YELLOW);
PgDrawEllipse ( &c1, &r, Pg_DRAW_FILL );
 |
Be sure to restore the old translation before leaving the raw widget's
drawing function. Here's one way to do it:
/* Restore the translation by subtracting the
   coordinates of the raw widget's canvas. */

raw_canvas.ul.x *= -1;
raw_canvas.ul.y *= -1;
PgSetTranslation (&raw_canvas.ul, Pg_RELATIVE);
|
As mentioned above, it's possible to draw beyond the raw widget's extent in its drawing function, but it's not a good thing to do:
It's possible to write the drawing function so that clipping isn't needed, but it can make your code more complicated. For example, if you try to write text that extends beyond the raw widget's canvas, you might need to draw partial letters. You'll also have to consider what happens if the user changes the size of the raw widget.
It's much easier to use PtClipAdd() (described in the Building Custom Widgets guide) to set the clipping area to be the raw widget's canvas and let the graphics driver restrict the drawing:
PtClipAdd ( widget, &raw_canvas);
Before leaving the drawing function, call PtClipRemove() (also described in Building Custom Widgets) to reset the clipping area:
PtClipRemove ();
If your raw widget's drawing function takes a lot of time, you might not want to redraw the entire canvas when a small portion of it has been damaged. You can speed up the repairs by using the drawing function's damage argument.
The damage argument is a pointer to a linked list of PhTile_t structures, each of which includes these members:
The damaged areas are relative to the raw widget's parent. At least one of them intersects the raw widget, but some of them might not.
If there's more than one tile in the linked list, the first one covers the entire area covered by the rest. Either use the first tile and ignore the rest, or ignore the first and use the rest:
void rawDrawFunction (PtWidget_t *widget,
                      PhTile_t *damage)
{
  if (damage-> != NULL) {

    // If there's more than one tile, skip the first.

    damage = damage->next;
  }

  while (damage != NULL) {

    // Examine 'damage' to see if any drawing
    // needs doing:
    //   damage->rect.ul.x, damage->rect.ul.y,
    //   damage->rect.lr.x, damage->rect.lr.y

    ...
    damage = damage->next;  // Go on the the next tile.
  }
}
If the contents of the raw widget are static, you can call the Pg drawing primitives directly from the raw drawing function. If the contents are dynamic, you'll need to define a data structure or model that describes them.
The structure of the model depends on your application; the raw drawing function must be able to traverse the model and draw the required graphics. Use the raw widget's Pt_ARG_USER_DATA resource to save a pointer to the model.
This drawing function draws a couple of ellipses, one of which is clipped:
void my_raw_draw_fn( PtWidget_t *widget,
                     PhTile_t *damage )
{
   PhRect_t     raw_canvas;
   PhPoint_t    c1 = { 80, 60 };
   PhPoint_t    c2 = { 30, 210 };
   PhPoint_t    r = { 72, 52 };

   PtSuperClassDraw( PtBasic, widget, damage );
   PtBasicWidgetCanvas(widget, &raw_canvas);

   /* Set the clipping area to be the raw widget's
      canvas. */

   PtClipAdd ( widget, &raw_canvas);

   /* Draw the ellipses. */

   c1.x += raw_canvas.ul.x;
   c1.y += raw_canvas.ul.y;
   PgSetFillColor(Pg_YELLOW);
   PgDrawEllipse ( &c1, &r, Pg_DRAW_FILL );

   c2.x += raw_canvas.ul.x;
   c2.y += raw_canvas.ul.y;
   PgSetFillColor(Pg_RED);
   PgDrawEllipse ( &c2, &r, Pg_DRAW_FILL );

   /* Reset the clipping area. */

   PtClipRemove ();
}
This function is the same, but it sets the translation:
void my_raw_draw_fn( PtWidget_t *widget,
                     PhTile_t *damage )
{
   PhRect_t     raw_canvas;
   PhPoint_t    c1 = { 80, 60 };
   PhPoint_t    c2 = { 30, 210 };
   PhPoint_t    r = { 72, 52 };

   PtSuperClassDraw( PtBasic, widget, damage );
   PtBasicWidgetCanvas(widget, &raw_canvas);

   /* Set the clipping area to be the raw widget's
      canvas. */

   PtClipAdd ( widget, &raw_canvas);

   /* Set the translation so that drawing operations
      are relative to the raw widget's canvas. */

   PgSetTranslation (&raw_canvas.ul, Pg_RELATIVE);

   /* Draw the ellipses. */

   PgSetFillColor(Pg_YELLOW);
   PgDrawEllipse ( &c1, &r, Pg_DRAW_FILL );

   PgSetFillColor(Pg_RED);
   PgDrawEllipse ( &c2, &r, Pg_DRAW_FILL );

   /* Restore the translation by subtracting the
      coordinates of the raw widget's canvas. */

   raw_canvas.ul.x *= -1;
   raw_canvas.ul.y *= -1;
   PgSetTranslation (&raw_canvas.ul, Pg_RELATIVE);

   /* Reset the clipping area. */

   PtClipRemove ();
}
Colors are specified in Photon with the PgColor_t type, a 32-bit Red-Green-Blue (RGB) representation:
| Reserved | Red | Green | Blue |
|---|---|---|---|
| 0000 0000 | rrrr rrrr | gggg gggg | bbbb bbbb |
Macros for the most commonly used colors are defined in <photon/Pg.h>.
Although PgColor_t uses 32 bits, only 24 bits are used per color. This representation is called true color. Photon is a true-color windowing system; it uses this 24-bit RGB representation internally.
Most graphics cards currently use true color (24 bits) or high color (16 bits). However, some graphics drivers will take advantage the palette on older palette-based cards.
Photon supports several simple, dual-purpose draw primitives:
 |
Don't use these drawing primitives in an interface that uses widgets;
widgets redisplay themselves when damaged, so anything drawn on top
of them will disappear.
To display arcs, lines, etc. in an interface:
|
By using each primitive's flags, you can easily draw an outline (stroke), draw the filled "inside" (fill), or draw both as a filled outline.
The current fill and stroke state are used.
| To: | Set flags to: |
|---|---|
| Fill the primitive with the fill state | Pg_DRAW_FILL |
| Outline the primitive with the stroke state | Pg_DRAW_STROKE |
| Fill the primitive with the fill state, then outline it with the stroke state | Pg_DRAW_FILL_STROKE |
Rectangles are drawn using the current graphics context with the PgDrawIRect() and PgDrawRect() functions.
PgDrawRect() uses a PhRect_t structure for the rectangle coordinates, while PgDrawIRect() lets you specify the coordinates individually.
The following example draws a blue, filled rectangle with no border:
void DrawFillRect( void )
{
    PgSetFillColor( Pg_BLUE );
    PgDrawIRect( 8, 8, 152, 112, Pg_DRAW_FILL );
}
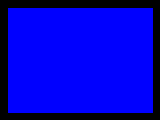
The above function DrawFillRect() could also be written using PgDrawRect():
void DrawFillRect( void )
{
    PhRect_t rect = {
        { 8, 8 }, { 152, 112 }
    };

    PgSetFillColor( Pg_BLUE );
    PgDrawRect( &rect, Pg_DRAW_FILL );
}
Use whichever method seems more natural for the code you're writing.
The following example will draw a white, unfilled rectangle border against a black background:
void DrawStrokeRect( void )
{
    PgSetStrokeColor( Pg_WHITE );
    PgDrawIRect( 8, 8, 152, 112, Pg_DRAW_STROKE );
}

Now we'll fill the rectangle with blue:
void DrawFillStrokeRect( void )
{
    PgSetFillColor( Pg_BLUE );
    PgSetStrokeColor( Pg_WHITE );
    PgDrawIRect( 8, 8, 152, 112, Pg_DRAW_FILL_STROKE );
}
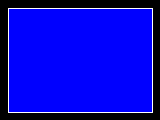
Rounded rectangles are programmed almost the same way as rectangles. You use PgDrawRoundRect(), with a PhPoint_t parameter to indicate, in pixels, the roundness of the rectangle corners. The radii PhPoint_t will be truncated to the rectangle's sides.
The following example will draw a black rounded rectangle with five pixels worth of rounding at the corners:
void DrawStrokeRoundRect( void )
{
    PhRect_t rect = {
        { 20, 20 },
        { 100, 100 }
    };
    PhPoint_t radii = { 5, 5 };

    PgSetStrokeColor( Pg_BLACK );
    PgDrawRoundRect( &rect, &radii, Pg_DRAW_STROKE );
}
A beveled box is a special type of rectangle. If you set flags to Pg_DRAW_FILL, the area of the beveled box is filled with the fill state. If you set flags to Pg_DRAW_STROKE, the top and left edges are drawn with the stroke state and the bottom and left edges are drawn with an extra color that's passed as one of the parameters. There's also a parameter to let you set the "depth" of the bevel.
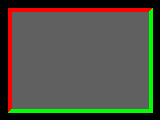
The following example will draw a beveled box filled with dark grey, with a green and red bevel four pixels wide:
void DrawBevelBox( void )
{
    PhRect_t r = { 8, 8, 152, 112 };
    PgSetFillColor( Pg_DGREY );
    PgSetStrokeColor( Pg_RED );
    PgDrawBevelBox( &r, Pg_GREEN, 4, Pg_DRAW_FILL_STROKE );
}
You can create polygons by specifying an array of PhPoint_t points. If you use Pg_CLOSED as part of the flags, the last point is automatically connected to the first point, closing the polygon. You can also specify points relative to the first point (using Pg_POLY_RELATIVE).
The following example will draw a blue-filled hexagon with a white outline:
void DrawFillStrokePoly( void )
{
    PhPoint_t start_point = { 0, 0 };
    int num_points = 6;
    PhPoint_t points[6] = {
        { 32,21 }, { 50,30 }, { 50,50 },
        { 32,59 }, { 15,50 }, { 15,30 }
    };

    PgSetFillColor( Pg_BLUE );
    PgSetStrokeColor( Pg_WHITE );
    PgDrawPolygon( points, num_points, start_point,
        Pg_DRAW_FILL_STROKE | Pg_CLOSED );
}
Polygons that overlap themselves are filled using the so-called even-odd rule: if an area overlaps an odd number of times, it isn't filled. Another way of looking at this is to draw a horizontal line across the polygon. As you travel along this line and cross the first line, you're inside the polygon; as you cross the second line, you're outside. As an example, consider a simple polygon:
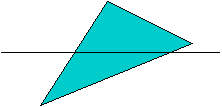
Filling a simple polygon.
This rule can be extended for more complicated polygons:
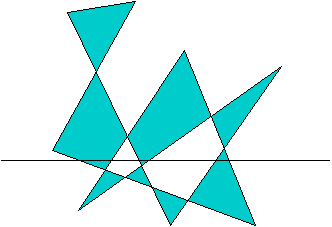
Filling an overlapping polygon.
 |
The even-odd rule applies to both the PgDrawPolygon() and PgDrawPolygonmx() functions. |
The PgDrawArc() function can be used for drawing:
The start and end angles of arc segments are specified in binary gradations (bi-grads), with 65536 bi-grads in a complete circle.
To draw a full circle or ellipse, specify the same value in bi-grads for the start and end angles. For example:
void DrawFullCurves( void )
{
    PhPoint_t circle_center  = { 150, 150 },
              ellipse_center = { 150, 300 };
    PhPoint_t circle_radii  = { 100, 100 },
              ellipse_radii = { 100, 50 };

    // Draw a white, unfilled circle.
    PgSetStrokeColor( Pg_WHITE );
    PgDrawArc( &circle_center, &circle_radii, 0, 0,
        Pg_DRAW_STROKE | Pg_ARC );

    // Draw an ellipse with a white outline, filled
    // with black.
    PgSetFillColor( Pg_BLACK );
    PgDrawArc( &ellipse_center, &ellipse_radii, 0, 0,
        Pg_DRAW_FILL_STROKE | Pg_ARC );
}
To draw a chord (a curve with the end points connected by a straight line), add Pg_ARC_CHORD to the flags parameter. For example:
void DrawChord( void )
{
PhPoint_t center = { 150, 150 };
PhPoint_t radii = { 100, 50 };
// Draw an elliptical chord with a white outline,
// filled with black. The arc is drawn from 0 degrees
// through to 45 degrees (0x2000 bi-grads).
PgSetStrokeColor( Pg_WHITE );
PgSetFillColor( Pg_BLACK );
PgDrawArc( ¢er, &radii, 0, 0x2000,
Pg_DRAW_FILL_STROKE | Pg_ARC_CHORD );
}
Similarly, to draw a pie section or curve, add Pg_ARC_PIE or Pg_ARC to the flags. For example:
void DrawPieCurve( void )
{
    PhPoint_t pie_center = { 150, 150 },
              arc_center = { 150, 300 };
    PhPoint_t pie_radii  = { 100, 50 },
              arc_radii  = { 50, 100 };

    // Draw an elliptical pie with a white outline,
    // filled with black.
    PgSetStrokeColor( Pg_WHITE );
    PgSetFillColor( Pg_BLACK );
    PgDrawArc( &pie_center, &pie_radii, 0, 0x2000,
        Pg_DRAW_FILL_STROKE | Pg_ARC_PIE );

    // Draw a black arc.
    PgSetStrokeColor( Pg_BLACK );
    PgDrawArc( &arc_center, &arc_radii, 0, 0x2000,
        Pg_DRAW_STROKE | Pg_ARC );
}
Lines and pixels are drawn using the current stroke state (color, thickness, etc.).
The following example will draw red, green, and blue lines:
void DrawLines( void )
{
    PgSetStrokeColor( Pg_RED );
    PgDrawILine( 8, 8, 152, 8 );
    PgSetStrokeColor( Pg_GREEN );
    PgDrawILine( 8, 8, 152, 60 );
    PgSetStrokeColor( Pg_BLUE );
    PgDrawILine( 8, 8, 152, 112 );
}

Text is drawn using the current text state. If you set flags to Pg_BACK_FILL, the text's extent is filled with the fill state. If you define an underline with PgSetUnderline(), the underline is drawn under the text and on top of the backfill.
For example, to print white text in 18-point Helvetica:
void DrawSimpleText( void )
{
    char *s = "Hello World!";
    PhPoint_t p = { 8, 30 };

    PgSetFont( "helv18" );
    PgSetTextColor( Pg_WHITE );
    PgDrawText( s, strlen( s ), &p, 0 );
}

To print white text on a blue background:
void DrawBackFillText( void )
{
    char *s = "Hello World!";
    PhPoint_t p = { 8, 30 };

    PgSetFont( "helv18" );
    PgSetTextColor( Pg_WHITE );
    PgSetFillColor( Pg_BLUE );
    PgDrawText( s, strlen( s ), &p, Pg_BACK_FILL );
}

To print white text with a red underline:
void DrawUnderlineText( void )
{
    char *s = "Hello World!";
    PhPoint_t p = { 8, 30 };

    PgSetFont( "helv18" );
    PgSetTextColor( Pg_WHITE );
    PgSetUnderline( Pg_RED, Pg_TRANSPARENT, 0 );
    PgDrawText( s, strlen( s ), &p, 0 );
    PgSetUnderline( Pg_TRANSPARENT, Pg_TRANSPARENT, 0 );
}

To print white text with a red underline on a blue background:
void DrawBackFillUnderlineText( void )
{
    char *s = "Hello World!";
    PhPoint_t p = { 8, 30 };

    PgSetFont( "helv18" );
    PgSetTextColor( Pg_WHITE );
    PgSetFillColor( Pg_BLUE );
    PgSetUnderline( Pg_RED, Pg_TRANSPARENT, 0 );
    PgDrawText( s, strlen( s ), &p, Pg_BACK_FILL );
    PgSetUnderline( Pg_TRANSPARENT, Pg_TRANSPARENT, 0 );
}

Bitmaps are drawn using the current text state. If you set flags to Pg_BACK_FILL, the blank pixels in the image are drawn using the current fill state.
The following example:
void DrawSimpleBitmap( void )
{
    PhPoint_t p = { 8, 8 };

    PgSetTextColor( Pg_WHITE );
    PgDrawBitmap( TestBitmap, 0, &p, &TestBitmapSize,
                  TestBitmapBPL, 0 );
}
will draw the bitmap against a transparent background.

The following example:
void DrawBackFillBitmap( void )
{
    PhPoint_t p = { 8, 8 };

    PgSetFont( "helv18" );
    PgSetTextColor( Pg_WHITE );
    PgSetFillColor( Pg_BLUE );
    PgDrawBitmap( TestBitmap, Pg_BACK_FILL, &p,
                  &TestBitmapSize, TestBitmapBPL, 0 );
}
will draw the bitmap against a blue background.

This section discusses:
Photon supports these main types of images:
Direct-color images have a type that starts with Pg_IMAGE_DIRECT_.
Palette-based images have a type that starts with Pg_IMAGE_PALETTE_.
You can define any image by its pixel size, bytes per line, image data, and format. For more information, see the description of the PgDrawImage() function in the Photon Library Reference.
Images can be stored in structures of type PhImage_t (described in the Photon Library Reference). The type field of this data structure identifies the type of image.
Palette-based images provide a fast, compact method for drawing images. Before drawing a palette-based image, you must set either a hard palette or soft palette to define the colors for the image.
Setting a hard palette changes the physical palette. All colors set with a PgSetFillColor() function will be chosen from this palette. Other processes will continue to choose colors from Photon's global palette and may appear incorrect. When you release the hard palette, the other processes will return to normal without being redrawn. You should always release the hard palette when your window loses focus.
Setting a soft palette lets you redefine how colors are interpreted for the given draw context without changing the physical palette. All colors in the soft palette will be mapped to the physical palette.
 |
If your physical palette uses more colors than your graphics card supports, some colors will be dropped, and the image won't look as nice. |
The image data (either bytes or nibbles) is an index into the current palette. For example:
PgColor_t   ImagePalette[256];
char       *ImageData;
PhPoint_t   ImageSize;
int         ImageBPL;

void DrawYourImage( PhPoint_t pos )
{
     PgSetPalette( ImagePalette, 0, 0, 256,
                   Pg_PALSET_SOFT );
     PgDrawImage( ImageData, Pg_IMAGE_PALETTE_BYTE, pos,
         ImageSize, ImageBPL, 0 );
}
With direct-color images, every pixel can be any color. But compared to palette-based images, the image data is larger and the image may take longer to draw. You can choose from several types of direct-color images, listed in the description of the PgDrawImage() function in the Photon Library Reference; each has a different image-pixel size and color accuracy.
With gradient-color images, colors are algorithmically generated as a gradient between two given colors.
To create a PhImage_t structure:
Or
Or
Or
The image_tag and palette_tag members of the PhImage_t structure are used for caching images when dealing with remote processes via phrelay (for example, when using phindows).
These tags are cyclic-redundancy checks (CRCs) for the image data and the palette, and can be computed by PxCRC(). If these tags are nonzero, phindows and phditto cache the images. Before sending an image, phrelay sends its tag. If phindows finds the same tag in its cache, it uses the image in the cache. This scheme reduces the amount of data transmitted.
 |
You don't need to fill in the tags if the images don't need to be saved in the cache. For example, set the tags to 0 if you're displaying animation by displaying images, and the images never repeat. |
PxLoadImage() and ApGetImageRes() set the tags automatically. PhAB generates the tags for any images generated through it (for example, in the pixmap editor).
If you want parts of an image to be transparent, you'll need to create a transparency mask for it. The transparency mask is stored in the mask_bm member of the PhImage_t structure. It's a bitmap that corresponds to the image data; each bit represents a pixel:
| If the bit is: | The corresponding pixel is: |
|---|---|
| 0 | Transparent |
| 1 | Whatever color is specified in the image data |
The mask_bpl member of the PhImage_t structure specifies the number of bytes per line for the transparency mask.
For palette-based images, you can build a transparency mask by calling PhMakeTransBitmap(). For other types of images, you must build the transparency mask manually.
There are various ways to display an image:
To draw the image repeatedly, call PgDrawRepImage() or PgDrawRepImagemx()
PgDrawPhImagemx() places the address of the image into the drawing buffer in your application's data space. When the drawing buffer is flushed, the entire image is copied to the graphics driver.
You can speed up the drawing by using shared memory. Call PgShmemCreate() to allocate the image data buffer:
my_image->image = PgShmemCreate( size, NULL );
If you do this, the image data isn't copied to the graphics driver.
 |
The images created and returned by ApGetImageRes() and PxLoadImage() aren't in shared memory. |
The PhImage_t structure includes a flags member that can make it easier to release the memory used by an image. These flags indicate which members you would like to release:
Calling PhReleaseImage() with an image will free any resources that have the corresponding bit set in the image flags.
 |
|
The flags for images created by ApGetImageRes() and PxLoadImage() aren't set. If you want PhReleaseImage() to free the allocated members, you'll have to set the flags yourself:
my_image->flags = Ph_RELEASE_IMAGE |
                 Ph_RELEASE_PALETTE |
                 Ph_RELEASE_TRANSPARENCY_MASK |
                 Ph_RELEASE_GHOST_BITMAP;
If the image is stored in a widget, the allocated members of images are automatically freed when an new image is specified or the widget is destroyed, provided that:
and
This section describes how you can create simple animation. There are two basic steps:
 |
It's better to use images for animation than bitmaps, as images aren't transparent (provided you haven't created a transparency mask). This means that the background doesn't need to be redrawn when replacing one image with another. As a result, there's no flicker when you use images. For other methods of eliminating flicker, see "Flickerless animation", below. |
It's also possible to create animation by using a PtRaw widget and the Photon drawing primitives. See "PtRaw widget", earlier in this chapter.
To animate an image you'll need a series of snapshots of it in motion. For example, you can use a PtLabel widget for animation. Create one PtLabel widget where you want the animation to appear, and create another PtLabel widget for each snapshot. You can store these snapshots in a widget database or a file.
As described in "Widget databases" in the Accessing PhAB Modules from Code chapter, you can use a picture module as a widget database. To use one for animation, do the following in PhAB:
In your application's initialization function, open the database by calling ApOpenDBase(). Then, load the images with the ApGetImageRes() function. For example,
/* global data */
PhImage_t *images[4];
ApDBase_t *database;
int cur_image = -1,
    num_images = 4;

int
app_init( int argc, char *argv[])

{
  int       i;
  char      image_name[15];

  /* eliminate 'unreferenced' warnings */
  argc =  argc, argv = argv;

  database = ApOpenDBase (ABM_image_db);

  for (i = 0; i < num_images; i++)
  {
    sprintf (image_name, "image%d", i);
    images[i] = ApGetImageRes (database, image_name);
  }

  return (PT_CONTINUE);
}
 |
Don't close the database while you're still using the images in it. |
You can also load the snapshots from a file into a PhImage_t structure, by using the PxLoadImage() function. This function supports a number of formats, including GIF, PCX, JPG, BMP, TGA, PNG and TIFF. For a complete list, see the <PxImage.h> file.
 |
The code for only the formats you choose is loaded into your application.
Define PX_IMAGE_MODULES, followed by the formats you want
before including the
<PxImage.h> file. For example, the following code causes the
code for PCX and BMP formats to be loaded:
#define PX_IMAGE_MODULES #define PX_PCX_SUPPORT #define PX_BMP_SUPPORT #include <PxImage.h> |
No matter where you get the images, the animation is the same:
For example, the callback for the timer could be as follows:
/* Display the next image for our animation example.     */
/*                            AppBuilder Photon Code Lib */
/*                                         Version 1.11  */

/* Standard headers */
#include <stdio.h>
#include <stdlib.h>
#include <unistd.h>
#include <string.h>

/* Toolkit headers */
#include <Ph.h>
#include <Pt.h>
#include <Ap.h>

/* Local headers */
#include "globals.h"
#include "abimport.h"
#include "proto.h"

int
display_image( PtWidget_t *widget,
               ApInfo_t *apinfo,
               PtCallbackInfo_t *cbinfo )

    {
        PtArg_t args[1];

    /* eliminate 'unreferenced' warnings */
    widget = widget, apinfo = apinfo, cbinfo = cbinfo;

        cur_image++;
        if (cur_image >= num_images)
        {
          cur_image=0;
        }

        PtSetArg (&args[0], Pt_ARG_LABEL_DATA,
                  images[cur_image],
                  sizeof (* (images[cur_image])));
        PtSetResources (ABW_base_image, 1, args);

        PtFlush ();

    return( Pt_CONTINUE );

    }
ABW_base_image is the widget name of the PtLabel widget in which the animation appears.
There are two ways to eliminate flicker in animation:
Or
When you do animation in a child of a double-buffered container, the PtDBContainer renders the drawing into an image in memory. The resulting image is rendered on the screen as a solid rectangular image. There's no need to draw the background first, so there's no flicker.
 |
PtRaw (like any other widget) can be a child of PtDBContainer. This means that you can have flicker-free animation even when using the Photon drawing primitives. |
The PtDBContainer widget creates an image. You can specify the type by setting the Pt_ARG_DB_IMAGE_TYPE resource:
The PtDBContainer widget uses the PmMem... functions to draw an image in memory. You can call these functions directly if you'd rather not use the double-buffered container:
Start by creating a memory context:
PmMemoryContext_t * PmMemCreateMC(
                        PhImage_t *image,
                        PhDim_t *dim,
                        PhPoint_t *translation );
The image structure must at least specify the type and size members. The image data buffer is optional, but if you want it in shared memory, you must provide it. The image type must be either Pg_IMAGE_DIRECT_888 or Pg_IMAGE_PALETTE_BYTE.
Once you've created the memory context:
When you no longer need the memory context, call PmMemReleaseMC().