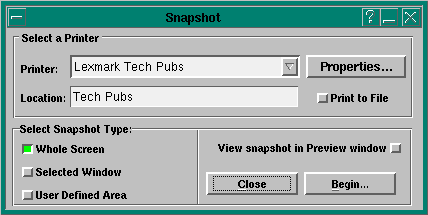
Capture a screen image
snapshot [-A widthxheight] [-f filename] [-o oxo]
         [-p printer_name] [-S i|n] [-s server] [-W rid]
         [-x x_pos] [-y y_pos]
- -A widthxheight
- Area (capture size).
- -f filename
- Output filename.
- -o oxo
- Origin.
- -p printer_name
- Printer name.
- -S i|n
- Specify initial window state (i - iconify, n - normal).
- -s server
- Use this server node or device name.
- -W rid
- Capture Region ID.
- -x x_pos
- Initial x_pos position of window.
- -y y_pos
- Initial y_pos position of window.
The snapshot utility captures portions of the Photon workspace
and saves the image as a PostScript (.ps) file.

To take a snapshot of an image:
- Specify whether the snapshot image goes to a printer or to a file:
- printer-select the printer displayed, or one from the pull-down list in the Printer field.
If required, you can modify the print properties by clicking the
Properties... button. For more information
on print properties, see the chapter on "Using the Print Dialogs" in the
Photon User's Guide.
- file-choose Print to File and specify the filename. (Default is printn.ps.)
Note that if you select "BMP Spool File" or "PS Spool File," the image is
automatically sent to a file.
- Specify one of the following snapshot types and click Begin:
- Whole Screen - The current screen image is captured.
- Selected Window - The snapshot dialog disappears and the pointer changes
to a yellow "finger." Position the pointer over the window you want
to capture, then click. To cancel without taking a snapshot, click on any area of
the workspace (but not in a window). Note that if you click anywhere inside a window
(i.e. in the window pane), you'll capture the window without the frame. To capture the window
with its frame, click anywhere on the frame.
- User Defined Area - The snapshot dialog disappears and the
pointer changes to a yellow "crosshair." Position the
pointer where you want to start the screen capture, then drag to
create a boundary around the area you want to capture. A snapshot of
the area inside the boundary will be taken as soon as you release the
mouse button.
When snapshot is running, you can switch consoles
in the standard fashion (using the Console Selector or the
Ctrl
-Alt
-1...9
keychords). The Snapshot dialog will follow between console switches.
However, once you click on a Snapshot Type button (Whole Screen,
Selected Window, or User Defined Area) and click Begin, only the current console is
available until you capture an image or cancel.
Run using Photon server on node 4:
snapshot -s4
Or
snapshot -s//4/dev/photon
Run at initial position (10,10):
snapshot -x10 -y10
Grab the area of the screen whose origin lies at (50,50) and whose dimension is 100*100
then save it as a BMP Spool File in /src/photon/apps/print1.bmp:
snapshot -A 100*100 -o 50*50 -p "BMP Spool File" -f /src/photon/apps/print1.bmp
The PWM_PRINTSCRN_APP lets you specify the application to start when the
Print Scrn key is pressed. By default, the snapshot utility is started.
