This chapter shows you how to set up different types of connections to the Internet and how to do a basic and advanced setup of the dialer, including creating and using the login script. Topics include:
Before you run Voyager you need to set up a connection to the Internet or an Intranet. There are many different ways to get connected, including:
If you have a network connection to the Internet, you can point Voyager at a node running Socket (or Socklet) that has access to the Internet. This is done by setting the SOCK environment variable to the appropriate node number (node_ID) before starting Voyager.
At the QNX prompt (or in a pterm) type:
export SOCK=node_ID
voyager &
Or:
SOCK=node_ID voyager &
| For more information about: | See the: |
|---|---|
| SOCK | Chapter on Socket Programming in QNX in the TCP/IP Programmer's Guide. |
| " | socks.conf man page in the TCP/IP User's Guide. |
| Socket (or Socklet) | Socket man page in the TCP/IP User's Guide. |
Using a proxy server to connect to the Internet is a popular method due to the increased need for security with the direct connection method. Before configuring Voyager to use a proxy server, you need to know the IP address and port number of each proxy server you'll be using. As a minimum, you need the IP address and port of an HTTP proxy server.
For example, to set up the HTTP proxy server:
If the HTTP proxy server is running and accessible, you should now be able to browse the Internet.
To use a SOCKS host, you'll need the IP address and port number (usually 1080) of the SOCKS host. Use the procedure just described for setting up an HTTP proxy server and fill in the SOCKS Host field. For further information, see the appendix on "SOCKS" in the TCP/IP Programmer's Guide and the socks.conf man page in the TCP/IP User's Guide.
If you don't have a direct connection to the Internet, you need to establish your connection using the Internet Dial-up Connector. With this dialer, you can set up and make a connection to your ISP. The dialer supports login scripts and basic TCP/IP configurations to automate your connection.
Open a pterm and type:
dialer &
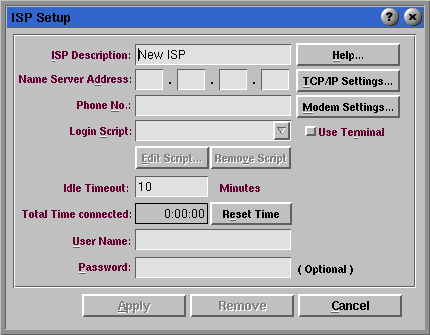
The first time you run the dialer, it prompts you to set up a new ISP:

ISP setup
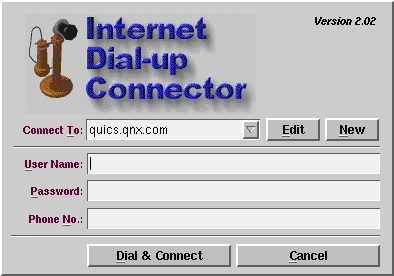
If an ISP has already been set up, then the dialer window appears:

Internet Dial-up Connector
In the ISP Setup dialog:
If you need to do only a typical ISP setup and pppd is running, you should now be able to browse the Internet. If the pppd program isn't already installed and configured, see your TCP/IP User's Guide ("Setting up QNX PPP" section in the Configuration chapter and the pppd man page).
The typical ISP setup just described works for most cases. If you can't make a connection with the typical ISP setup, you may need to change the default TCP/IP and modem settings and to create a login script.
There are two TCP/IP settings:
Example: 204.34.53.1
Example: 204.34.53.34
In the Device (Port) field, type the pathname of the port your modem is using. The Initialization String and Baud Rate fields normally don't need to be changed. The Initialization String is ATZ by default.
The dialer has a builtin login script that does the following:
If your login process is different, you'll need to create a login script. For example, suppose your ISP has a two-level login process. You could create a login script that looks like this:
| Wait for: | Reply with: | Status: |
|---|---|---|
| *login* | pppuser | Connected... |
| *password* | xyzzy | |
| *login* | $USER | Logging in... |
| *password | $PASSWORD |
 |
Leave the Login Script field blank. |
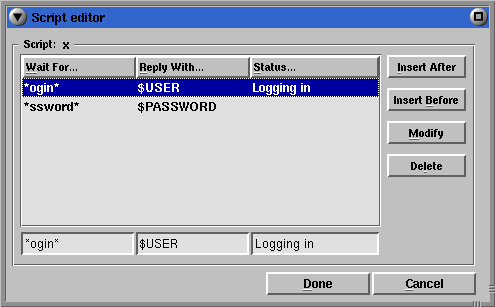
Here's the Script editor displaying the default login script:

Script Editor
| Login script element | Description |
|---|---|
| Wait For | The dialer receives characters from the remote host until there's a match
with the pattern in the Wait For entry.
The dialer uses the POSIX function fnmatch (pattern,
line, FNM_QUOTE) to do the match.
The syntax for patterns is similar to the shell's filename patterns except that a forward slash (/) is treated as an ordinary character. All Wait For checks are done in lower case, which means that "LOGIN" and "login" will match. If a pattern consisting of a single backslash (\) is used in the first line of a script, the dialer proceeds without waiting for characters from the remote host. |
| Reply With | When the dialer has a match for the Wait For entry,
the dialer emits the reply in the Reply With entry to the remote host.
The dialer then emits a CR character unless the reply ends with a backslash (\). For other special character sequences, see the " Reply character sequences " section below. |
| Status | In this field, compose a status message reflecting a stage during the login process. Status messages are displayed in the dialer status window. |
Patterns use these special characters:
| Special character | Description |
|---|---|
| ? | Match any single character. |
| * | Match any sequence of characters, including an empty string. |
| [...] | Match a single character specified in the bracket expression. |
| \ | Quote the following character. |
For example, *\** will match any line of characters containing an asterisk.
Here are the special character sequences that can be used in a reply:
| Special character sequence | Description |
|---|---|
| $USER | User Name specified in the ISP entry |
| $PASSWORD | Password specified in the ISP entry |
| \r | CR character |
| \n | Newline character |
| \xhh | Single character whose hex representation follows as hh |
| \B | 500 msec break on the line |
| \D | Drop the line for 1 second |
| \Phh | Pause for hh 1/10's of a second where hh is hex representation |
| \d# | Set the number of data bits (# is 5, 6, 7, or 8) |
| \s# | Set the number of stop bits (# is 1 or 2) |
| \p# | Set the parity (# is n=none, e=even, o=odd, m=mark, or s=space) |